We've moved! Peek & Ponder has moved homes and is not updating this site. You will be redirected to http://peekandponder.com.

October 30, 2012

Last Minute Halloween Nails

I'm loving nail art and lately and I already posted a step-by-step picture tutorial on these candy corn nails. I also came up with some quick Halloween nails that are easy to accomplish, even without nail art skills.
I thought these nails were great for a last minute Halloween manicure. Maybe you're getting ready to go out on Halloween, but don't have time for elaborate nail art - try any or all of the following quick designs. 


Let's take a look at how to get these Halloween nails...
After applying a base coat, I painted my nails with Sally Hansen's Complete Salon Manicure in Plum Luck (640). It's a deep eggplant shade.

Without a flash

Taken with a flash


On my index finger I made a ghost shape with white nail polish. Then I dipped my dotting tool in black polish and made three dots for the eyes and mouth. Done!


For the spiderweb on my ring finger, I used a white striper to make diagonal lines across my nail. 


Then I used the striper to connect the lines and make a web. Done!


I made the spooky eyes on my thumb nail with the white striper as well. These are pretty self-explanatory and super quick. Done!
That's it! Wasn't that simple? I left the other two nails blank because I didn't want my nails to be too busy.

I also liked the look of just a spiderweb on my ring finger for a more simple  design.


I think it would look cool to do spiderwebs on a couple of nails in different directions and if you're feeling extra skilled, you can add a spider somewhere.

Any of the designs I showed can be used in different combinations.
Which design did you like best? The ghost? The spiderweb? The spooky eyes? 


October 29, 2012

Halloween Look: Zombie

Last year, Mark let me paint his face for Halloween (here's what I did). It took forever, but he was a really good sport. I had him sitting in one of our bathrooms and I could tell he was beyond bored. This year, he agreed to let me do it again. This time, I set him up in our office so he could watch a movie and that helped the time go by a lot faster (Of course he watched Iron Man).

 I chose to do a zombie look on him, complete with blood and wounds. It looked pretty cool when I finished. Mark was impressed.


I bought a full kit with grease makeup, cream makeup, blood, scar putty, etc. from Walmart (this is a similar kit) Then I also picked up a little bottle of liquid latex from the Halloween store for a few dollars.

I started with the liquid latex and let me tell you, it does not smell pretty! Mark could hardly stand the smell as I was applying it. He had a sour face the whole time - it was pretty funny! I was using the liquid latex to create wounds in a few areas. In the end, it didn't make much of a difference in the way the whole look turned out. If I use it again in the future, I'll have to play with it a little more.

Then I applied the grease makeup all over his face. I used brown, white, gray, yellow, green, and black to make his skin look trashed and worn out. I even drew in some exposed teeth (not sure that it looks entirely believable though).

After all the color was applied and blended, I added some blood and that completed this zombie look.


How do you think it turned out? 


October 28, 2012

Beauty Posts of the Week (10/28)


Check out this week's posts from beauty bloggers of the Beauty Blog Coalition

October 25, 2012

Halloween Look: Masquerade Mask

A few days ago I shared a Pirate look I did on myself. I wanted to do another Halloween look that was a little more colorful and whimsical. I created a masquerade look complete with various color, crazy lashes, and pretty jewels.

Here's the look:


How To:

1. I started by drawing the outline of a mask with a black crayon and filling it in with white cream makeup (they can be found in a kit like this). I also applied my eyeliner and mascara at this point because I thought it might be harder to do later without smudging my mask


2. I filled in the whole mask with different colors of eyeshadow - I used the Urban Decay Book of Shadows Vol III for this. The white cream acted as a great base for the colors I was using. I created shaded areas to make more dimension.


3. Then I added jewels to my mask with lash glue. I picked up a set of assorted craft jewels at Michael's for just a few dollars. 


4. To complete the look, I added long feathery lashes.


For my lips, I applied a light pink lipstick. For my hair, I used a 1-inch curling iron to add some loose curls and volume.

I loved creating this look. It's colorful and much more fun than just buying a mask at the store. It didn't take too long either. The only part that was time consuming was filling in the mask with eyeshadow; everything else was really quick.


How do you like this masquerade look? Would you try something similar?


October 23, 2012

Breast Cancer Awareness

October is Breast Cancer Awareness Month and I wanted to take a quick break from beauty to share this infographic. Below you'll find breast cancer stats and info that everyone should know. Read it and share it with others. It's important for everyone to be informed about this topic.


October 22, 2012

October Birchbox: theBalm, LiQWd, Harvey Prince


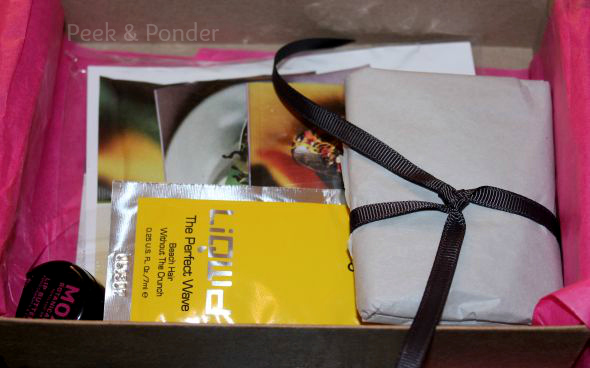
This month, Birchbox let us choose between a "Goop" box and a regular box. I didn't choose because I was unsure which I would wind up liking more. I was given the regular box which contained products dedicated to "transformations" or changes in beauty.


What came in my box


Harvey Prince Eau Flirt
Full size $55-98
My sample size: Not sure of exact size


This flirtatious scent pairs pumpkin with lavender, two scents that positively stimulate men. Other notes include citrus, freesia, nutmeg, and cinnamon.
My thoughts: Yep, another fragrance sample. Luckily, I happen to like the scent. I don't pick up on the pumpkin very well, but I can detect the lavender, freesia, and cinnamon. I'm not sure if I like it enough to buy it yet.


LiQWd SiLK Professional Deep Conditioning Treatment
Full size $24 (120 ml)
My sample size: 7 ml


This conditioning treatment contains quinoa proteins to make hair moisturized, nourished, and tangle-free. You apply the treatment once a week to clean, wet hair. Comb and let sit for 5-15 minutes, then rinse out.
My thoughts: This brand seems familiar (sarcasm)! More on that later. As for the product, I haven't tried it yet. Since the sample is only enough for one use, I won't really be able to tell how well it works. It's doubtful I'll buy this based on one use.


LiQWd The Perfect Wave
Full size $22 (150 ml)
My sample size: 7 ml


A texturizer that gives you tousled beach hair. The formula is lightweight, but it volumizes and creates body while fighting frizz. To use, you apply a dime-sized amount through clean hair and scrunch.
My thoughts: I used this once already. It made my hair look a little stringy. Again, there isn't enough in this sample to determine if I like it or not.


Mox Botanicals Pomegranate & Fig Lip Butter
Full size $16 (0.2 oz)
My sample size: 0.1 oz


A lip balm from Oregon made with shea butter, jojoba, and other natural ingredients. It doesn't contain parabens, chemical preservatives, or harmful additives.
My thoughts: While I don't care for balms in a jar like this, I like that this lip butter makes my lips soft and smooth. The scent is very pleasant. This sample size is big enough that I will be able to use it for awhile. So far I like it a lot.


theBalm Cosmetics Mary-Lou Manizer  
Full size $24 (8.5 g)
My sample size: 1.0 g


A three-in-one luminizing powder that can be used as a highlighter, eyeshadow, or all over shimmer.
My thoughts: I love it! This is the cutest sample I've ever received and I really like the powder. I see a purchase in my future and also more purchases from this brand.


Extra
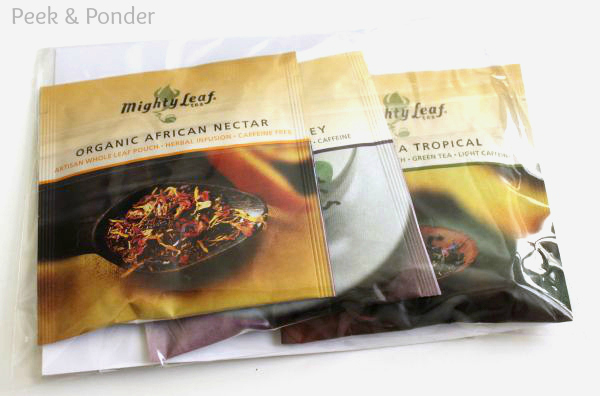
Mighty Leaf Tea Assorted Teas
Box of 15 $9.95
My sample size: 3 pouches (Green Tea Tropical, Organic African Nectar, Organic Earl Grey)


Whole leaf blends that come in a biodegradable pouch and made with natural ingredients. Each pouch is labeled with caffeine content and brewing time.
My thoughts: I drink tea every once in awhile, but I usually don't branch out with my selections. Since cold weather is on it's way, I can give these a taste. I normally don't like food/drink items in my box but this is an extra I don't mind.


Overall thoughts:
On a scale of 1-10, I'd rate this box a 6. My favorite products are the luminizing powder and the lip butter. I'm really happy I got both of those. On the other hand, I wasn't thrilled with getting the two hair samples. Don't get me wrong, I love trying new hair products, but I had two samples from the same company in my last box. On top of that, the size of these samples aren't big enough for me to fully test. Also, I am getting tired of the fragrance samples already! I can get fragrance samples anywhere; I really want samples of other products that are harder to find.
I like this month's box regardless of its shortcomings. We'll see what next month brings!

Sign up for Birchbox

Want more Birchbox reviews? Go here.


Disclaimer: This is not a paid or sponsored review. The box was purchased by me and all opinions are my own. A referral link was used. An affiliate link was used.

October 20, 2012

Halloween Look: Pirate

This month, I'm sharing some of my own Halloween-themed creations: from makeup to nails (check out my candy corn nails!). For one of the looks, I chose to do a pirate.


For hair: I left it looking disheveled and added a few random braids. My hair naturally dries wavy like this, but I hardly ever wear it natural.

For accessories: I found the bat bandanna at Walmart for $1 and tied it on my head like a pirate. I added big, medallion earrings that I already had.


For makeup:


Eyes - I created a smudged smokey eye. I blended black, gray, and brown shades for the shadow. I applied liquid liner along with a couple coats of mascara.


Lips - I initially used a red lipstick for this look but my eyes were already pretty dramatic. I dabbed some of the red off and added a nice fall brown shade over top. The result was a spiced peachy brown color.

This look was very simple and inexpensive. I didn't buy anything except for the bandanna. I would definitely wear this for a casual Halloween look without going all out on a costume. 

October 18, 2012

Wet n Wild Comfort Zone Palette

The Wet n Wild eyeshadow palettes are really popular right now. Can you blame anyone for loving them?! They are very inexpensive, come in a variety of color combinations, and have great color payoff!
I wrote a review on one of the eyeshadow trios awhile back (here it is) and I thought it was a great product. When I discovered the 8 pan eyeshadow sets, I knew I had to have at least one.

Comfort Zone - 738
Price - $4.99
Buy it: Drugstore.com


The set comes with colors designed for all parts of the eye area and are appropriately labeled. There are two colors for the browbone (otherwise known as highlight shades), two for the eyelid, two for the crease, and two to use as definers. The labels make the whole eyeshadow process pretty easy, right? Of course you don't have to use them as they're intended; you can mix and match as you please!


Swatches

These are swatches from the left side of the palette


 These are swatches from the right side.


The colors are ideal for creating earthy, sun-kissed, and natural looks.


I used the green and brown shadows to create this look. 

The shadows are velvety smooth and blendable. I was happy with the way they applied and how long they lasted. My eyeshadow easily stayed in place all day and didn't crease or shift.


I knew I would love this palette based on my experience with the trio. The quality is excellent and the price is unbelievable.  I would've never guessed it was only $4.99 if I hadn't known. I think it's safe to say these palettes make the must-have list. I must have more!


 Disclaimer: This product was purchased by me. All opinions are my own. Affiliate links were used.

October 17, 2012

Beauty Blog Coalition $500 Giveaway!


The ladies of the Beauty Blog Coalition have teamed up once again to host another sweepstakes for our dear readers!  The Beauty Blog Coalition Halloween Sweepstakes begins today, 17 October and will end on 1 November 2012.  One winner will receive a $500 USD Visa Gift Card!  All terms and conditions may be found at the bottom of the Rafflecopter widget.  Please allow the widget to load in full.  You may enter on any of the participating blogs below - Rafflecopter will not allow you to enter twice.  You may tweet about the giveaway (the last option in the Rafflecopter) every day for extra entries!


Participating Blogs


a Rafflecopter giveaway

October 13, 2012

Beauty Posts of the Week


Check out these great beauty posts from members of the Beauty Blog Coalition.

October 11, 2012

Anastasia Want You to Want Me Kit

Last month, I posted about a new holiday kit from Anastasia (Kisses On My List gloss set). Now, I have another to share with you! It's the Want You to Want Me kit - the 1970's glam kit within a clutch. Inside the velvety clutch, you'll find a removable eye shadow palette, a dual-sided brush, liquid eyeliner, and a mini clear brow gel

This is the packaging. The clutch comes in this sleeve.


Here's what the clutch looks like outside of the sleeve.


Here's what comes inside the kit.


The eye shadow palette comes with nine gorgeous shades that are inspired by 70's rock. Included in the compact are matte and shimmer shadows, ranging from nude to plum, The shadows can be worn wet or dry and are crease-free.


The palette is very small and will easily fit into most bags or clutches, plus it has a little mirror for those on-the-go touch-ups.


Shades: (top row) Platform Wedge, Front Row Center, Ziggy, (middle row) Members Only, Power Ballad, Jellies, (bottom row) Graphic T's, Brass in Pocket, Iron On

Swatches:


Dual-sided brush


The liquid eyeliner creates a smooth, pure black line. In the swatches below, I was able to make both thick and thin lines. Applying liquid eyeliner does take some practice, but it can help make your eyes look super intense!


The clear brow gel is great to keep eyebrows in place  throughout the day and into the night. 


This whole kit is beautiful and luxurious. I use the products within the kit all the time. I think it's very affordable and ideal for the holidays. You can create a nice range of looks for a variety of occasions. This kit would make a perfect gift for the women in your life! 


Disclaimer: This kit was sent to me for the purpose of review but all opinions on the product are my own. I am not being compensated for this post. Affiliate links were used.

09 10 Subscribe